
Shin Splints Explained: Causes, Symptoms, and How to Prevent Them
Mar 21, 2025
Edited by: Danielle Abel
Shin splints—also known as medial tibial stress syndrome (MTSS)—are one of the most common overuse injuries in running and jumping sports. If you or your athletes have ever experienced aching pain along the shin bone, you know how frustrating and limiting it can be.
But here’s the good news: shin splints are preventable with smart training, strength work, and movement optimization.
In this guide, we’ll break down:
✅ What shin splints are and the science behind MTSS
✅ The biggest training mistakes that lead to shin splints
✅ How bone adaptation impacts tibial stress
✅ The best exercises and training strategies to keep shin splints from happening in the first place
What Are Shin Splints? (Understanding Medial Tibial Stress Syndrome)
Shin splints occur when repetitive stress overloads the tibia and surrounding muscles, leading to inflammation and microdamage. The pain typically appears along the medial (inner) edge of the shin bone and worsens with continued impact activities like running or jumping.
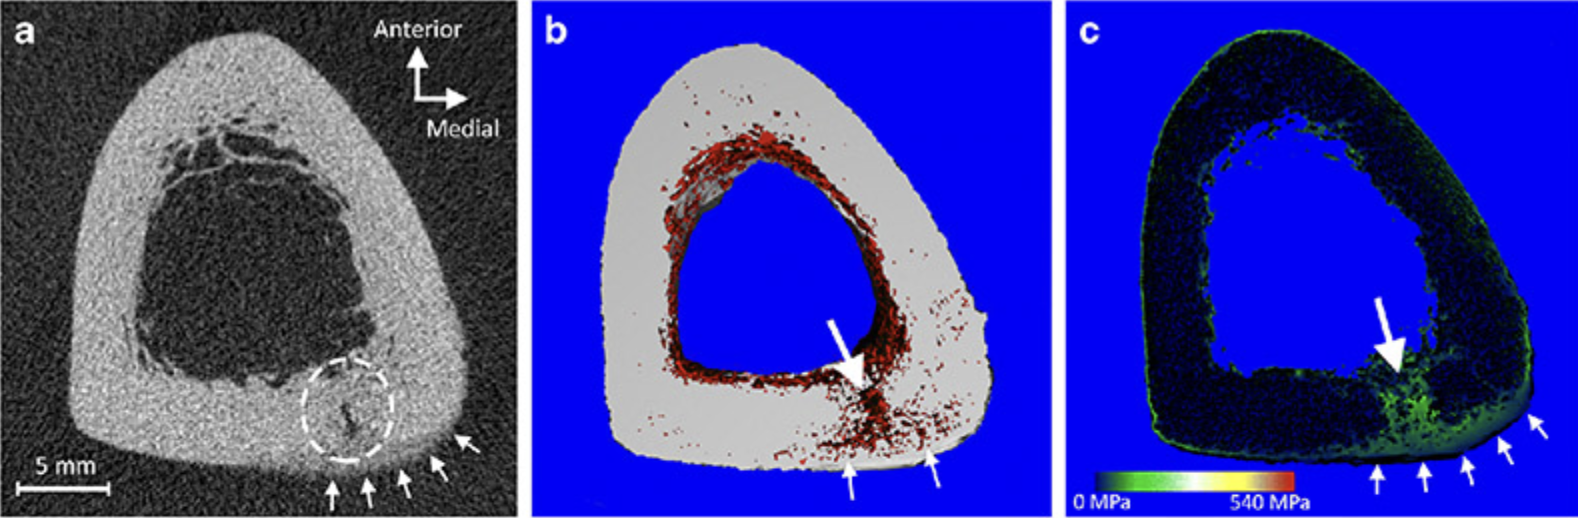
1. Bone Remodeling & Stress Accumulation
- The tibia absorbs impact forces with every step or jump
- Normally, bones break down and rebuild to adapt to stress (Wolff’s Law)
- When breakdown outpaces rebuilding, microdamage accumulates—leading to shin splints or stress fractures (Milgrom et al., 2000)
Muscle Fatigue & Shock Absorption Failure
- The soleus, tibialis anterior, and tibialis posterior help absorb impact
- When these muscles fatigue, they pull excessively on the tibial periosteum (bone lining), leading to pain and inflammation
Poor Running Mechanics & Overloading the Tibia
- Overstriding and excessive pronation increase tibial stress
- Restricted ankle dorsiflexion forces compensatory movements that worsen shin loading (Pavithra et al., 2022)
Symptoms of Shin Splints (Medial Tibial Stress Syndrome)
1. Dull, Aching Pain Along the Inner Shin
-
The most common symptom of shin splints is a deep, aching pain along the medial (inner) border of the tibia
-
This pain is often diffuse, meaning it spreads across a large area rather than being localized to a single point
-
Early stages: Pain starts mild and may only occur after exercise
-
Progression: Pain may develop during activity and persist for hours or days afterward
-
2. Pain That Worsens with Running or Jumping
-
Shin splint pain is typically exacerbated by weight-bearing activities such as:
✅ Running (especially long distances or downhill)
✅ Jumping (e.g., basketball, volleyball, plyometrics)
✅ Rapid changes in training load (e.g., sudden increase in mileage or intensity)
-
Athletes often report that the pain improves with rest but returns once activity resumes
3. Tenderness and Swelling Along the Tibia
-
Pressing along the medial border of the tibia (especially in the lower third) often elicits tenderness
-
Some cases may also present with mild swelling due to underlying inflammation of the periosteum (outer bone layer)
4. Stiffness and Tightness in the Lower Leg Muscles
-
Athletes with shin splints frequently experience tightness or fatigue in the:
-
Soleus muscle (deep calf muscle)
-
Tibialis posterior (supports the arch)
-
Flexor digitorum longus (toe flexor)
-
-
This muscle fatigue reduces shock absorption, further increasing tibial stress
5. Pain That Initially Improves with Warm-Up, Then Worsens
-
In the early stages, athletes may feel temporary relief once they warm up
-
As MTSS progresses, pain becomes more persistent, lasting throughout the workout and beyond
If shin splints become sharp and localized, see your doctor, as they may have progressed to a stress fracture, requiring extended rest and recovery.
How Training Impacts Your Bones & Shin Splint Risk
Not all tibias are built the same. Bone adaptation is influenced by sport-specific movement patterns.
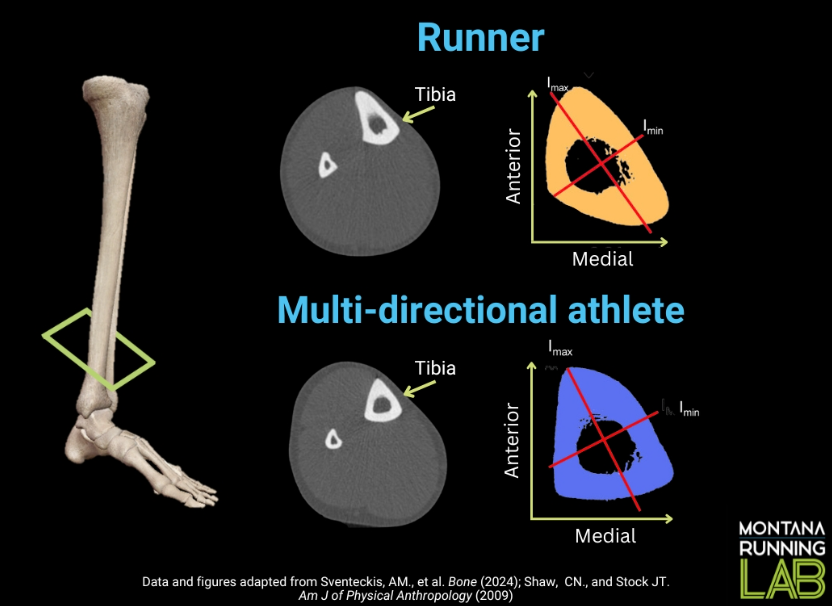
🏃 Runners (Narrow, Elongated Tibia) → Higher MTSS Risk
- Linear running applies sagittal plane stress, causing elongated tibial adaptation
- Less lateral reinforcement = greater vulnerability to stress fractures
⚽ Multi-Directional Athletes (Rounded Tibia) → More Resilient Bone Structure
- Cutting, jumping, and lateral movement create multi-directional loading
- The tibia becomes more rounded, increasing resistance to stress-related injuries
✅ What This Means for Athletes:
- If you train only in one movement pattern (e.g., distance running), your bones adapt accordingly—but this can increase shin splint risk
- Incorporating lateral movements, agility drills, and strength training helps create a more resilient tibia
-
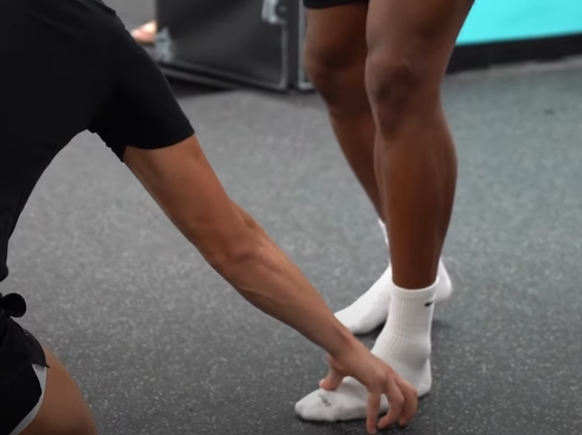
Mobilization & Ankle Dorsiflexion Matter
- Ankle mobility drills reduce MTSS symptoms by improving shock absorption and foot mechanics (Pavithra et al., 2022)
- Athletes with restricted dorsiflexion (<12° flexion) are 3x more likely to experience shin splints
- In the image below, adding lateral heel elevation allows for more ankle eversion (towards the midline of the body) and as a result can help with gaining midfoot mobility

How to Prevent Shin Splints: Evidence-Based Strategies
S-Tier (Most Effective for Prevention & Rehab)
-
Gradual Training Progression – Increase running volume and plyometrics by no more than 10% per week to allow proper bone adaptation
-
Progressive Plyometric Training – Volume should be strategically increased, e.g., 110 foot contacts → 121 next week. Higher-intensity plyos (depth jumps, bounding) should be introduced gradually
A-Tier (Highly Effective Strength & Mobility Work)
- Toe Elevated Calf Raises – Places stress through the plantar fascia on the bottom of the foot, the connective tissue that connects the heel to the toes
- Dumbbell Split Squats – Could be helpful for weak glutes and quads, which plays a role in controlling tibial load
- Tibial Torsion Drill (below) – This drill is performed in a standing position, with the shoes off if possible, keeping the big toe down, and rotating the tibia (one of the shin bones) out to the lateral side of the body and then back inwards towards the medial side of the body.
- As the leg comes inward, work on pronating the midfoot (collapsing the arch and flattening out the foot) and as the leg goes outward, work on supinating the midfoot (raising the arch) and shifting your weight to the outside edge of the foot while keeping your big toe down.
- You should see the kneecap rotate back and forth, left to right, or right ot left, over the foot The movement should be slow and controlled and can be performed for about 1-2 minutes on each leg
-
Plantarflexion Inversion Drill (below) – This drill is a controlled version of what happens when someone sprains their ankle by inverting their ankle, rolling onto the outside of the foot and then pointing the toes down.
-
This drill addresses range of motion limitations that many people have with plantarflexion and ankle inversion.
-
If you or your athletes have ever had an ankle sprain, the body’s natural defense mechanism to prevent this injury from happening again is to tighten up the peroneal muscles on the lower outside leg. This then limits ankle plantarflexion and ankle inversion in the future, basically resulting in limited mobility and lack of stability in the ankle.
-
This drill is done by turning the inside of the foot inward while simultaneously curling the toes inward and downward. It can be performed standing, using the ground to get into inversion, or it can be done sitting, using the opposite hand to curl the midfoot and big toe inward and then opening up in the opposite direction by using the hand to evert the ankle and pull the big toe upward.
-
Massaging the outside of the lower leg can also assist with gaining range of motion through the ankle by relaxing the peroneal muscles using a gentle massaging motion
-

B-Tier (Supportive Strength & Recovery Work)
- Ankle Dorsiflexion Stretching – Improves range of motion and reduces movement restrictions
- Short Foot Exercises (Arch Control Work) – Strengthens intrinsic foot muscles to prevent excessive shin loading
- Tibialis Wall Raises – Improves anterior shin strength for better impact absorption, but must be challenging, try 3x10-15
C & D-Tier (Less Effective or Temporary Fixes)
- Backwards Walking - Could be added for low level tibial stress to early rehab phases
-
Icing, Kinesiology Tape, Compression Sleeves – Temporary relief but doesn't address the root cause of improper progression
-
Changing Running Surfaces – May help reduce impact but should not replace proper training modifications
Summary & Takeaways
✅ Modify Training Load – Reduce running/jumping volume until pain subsides.
✅ Strengthen Key Muscles – Focus on calves, tibialis anterior, and foot stability to reduce tibial stress.
✅ Improve Running Mechanics – Avoid overstriding and ensure proper knee tracking to minimize impact forces.
✅ Optimize Footwear – Ensure shoes are supportive and not overly worn out (replace every 300-500 miles).
✅ Enhance Recovery – Implement soft tissue work, foam rolling, and ankle mobility drills to reduce muscle tension.
Training Programs Available
Whether you're a beginner or a seasoned athlete, our Hybrid Athlete Team program adapts to your fitness level. Progressive training ensures constant growth, and complimentary expert guidance and coaching from us guarantee you're on the right track to hitting your running and lifting goals. Click here to check out our Hybrid Athlete Team program on Train Heroic today.
Stay connected with news and updates!
Join our mailing list to receive the latest news and updates from our team.
Don't worry, your information will not be shared.
We hate SPAM. We will never sell your information, for any reason.
